This blog post explores how to leverage rich text Flutter to enhance your app’s UI, complete with multiple examples to guide you through the process. One of the key aspects of creating an engaging user interface (UI) is effectively using rich text.
Table of Contents

Why Rich Text Flutter?
Rich text allows developers to style text in a variety of ways within a single block of text. This includes changing the font, size, and color, and adding other stylistic elements such as bold, italics, and underlines. By utilizing rich text, you can make your app’s content more readable, engaging, and visually appealing.
Introduction to RichText Flutter Widget
Flutter’s RichText widget is the primary tool for displaying rich text in your app. It enables the creation of a paragraph of text with multiple styles. Here’s a basic example to illustrate the use of RichText:
import 'package:flutter/material.dart';

void main() => runApp(MyApp());

class MyApp extends StatelessWidget {
  @override
  Widget build(BuildContext context) {
    return MaterialApp(
      home: Scaffold(
        appBar: AppBar(title: Text('Rich Text Example')),
        body: Center(
          child: RichText(
            text: TextSpan(
              text: 'Hello ',
              style: TextStyle(fontSize: 24, color: Colors.black),
              children: <TextSpan>[
                TextSpan(text: 'beautiful ', style: TextStyle(fontWeight: FontWeight.bold, color: Colors.blue)),
                TextSpan(text: 'world!', style: TextStyle(fontStyle: FontStyle.italic, color: Colors.green)),
              ],
            ),
          ),
        ),
      ),
    );
  }
}
In this example:
- The main text is styled with a default size and color.
- The word “beautiful” is bold and blue.
- The word “world!” is italic and green.
Advanced Usage of Rich Text Flutter
Mixing Fonts and Sizes
You can mix different fonts and sizes within a RichText widget to create a more dynamic and engaging UI.
RichText(
  text: TextSpan(
    text: 'Flutter ',
    style: TextStyle(fontSize: 20, fontFamily: 'Roboto'),
    children: <TextSpan>[
      TextSpan(text: 'is ', style: TextStyle(fontSize: 22, fontFamily: 'Times New Roman')),
      TextSpan(text: 'amazing!', style: TextStyle(fontSize: 24, fontFamily: 'Courier', fontWeight: FontWeight.bold)),
    ],
  ),
)
Adding Links (add url_launcher)
Rich text can also include tappable links, making it easy to direct users to different parts of your app or external websites.
RichText(
  text: TextSpan(
    text: 'For more info, visit ',
    style: TextStyle(fontSize: 18, color: Colors.black),
    children: <TextSpan>[
      TextSpan(
        text: 'Flutter.dev',
        style: TextStyle(color: Colors.blue, decoration: TextDecoration.underline),
        recognizer: TapGestureRecognizer()
          ..onTap = () {
            launch('https://flutter.dev');
          },
      ),
      TextSpan(text: ' for details.', style: TextStyle(color: Colors.black)),
    ],
  ),
)
Highlighting Text
Highlighting specific parts of text can draw attention to important information.
RichText(
  text: TextSpan(
    text: 'Notice the ',
    style: TextStyle(fontSize: 18, color: Colors.black),
    children: <TextSpan>[
      TextSpan(
        text: 'highlighted',
        style: TextStyle(backgroundColor: Colors.yellow),
      ),
      TextSpan(text: ' text.', style: TextStyle(color: Colors.black)),
    ],
  ),
)
Combining Widgets
You can combine RichText with other widgets to create a cohesive UI. For instance, using Column or Row to display text along with icons or images:
Column(
  mainAxisAlignment: MainAxisAlignment.center,
  children: [
    RichText(
      text: TextSpan(
        text: 'This is ',
        style: TextStyle(fontSize: 18, color: Colors.black),
        children: <TextSpan>[
          TextSpan(text: 'Flutter', style: TextStyle(fontWeight: FontWeight.bold, color: Colors.blue)),
          TextSpan(text: ' with an icon: ', style: TextStyle(color: Colors.black)),
        ],
      ),
    ),
    Icon(Icons.flutter_dash, size: 50, color: Colors.blue),
  ],
)
Bonus Code
import 'package:flutter/material.dart';

void main() => runApp(MyApp());

class MyApp extends StatelessWidget {
  @override
  Widget build(BuildContext context) {
    return MaterialApp(
      home: Scaffold(
        appBar: AppBar(title: Text('Rich Text Example')),
        body: Padding(
          padding: const EdgeInsets.all(16.0),
          child: SingleChildScrollView(
            child: Column(
              crossAxisAlignment: CrossAxisAlignment.start,
              children: <Widget>[
                Text(
                  'Basic Rich Text:',
                  style: TextStyle(fontSize: 20, fontWeight: FontWeight.bold),
                ),
                RichText(
                  text: TextSpan(
                    text: 'Hello ',
                    style: TextStyle(fontSize: 24, color: Colors.black),
                    children: <TextSpan>[
                      TextSpan(
                          text: 'beautiful ',
                          style: TextStyle(
                              fontWeight: FontWeight.bold, color: Colors.blue)),
                      TextSpan(
                          text: 'world!',
                          style: TextStyle(
                              fontStyle: FontStyle.italic,
                              color: Colors.green)),
                    ],
                  ),
                ),
                SizedBox(height: 20),
                Text(
                  'Mixing Fonts and Sizes:',
                  style: TextStyle(fontSize: 20, fontWeight: FontWeight.bold),
                ),
                RichText(
                  text: TextSpan(
                    text: 'Flutter ',
                    style: TextStyle(fontSize: 20, fontFamily: 'Roboto'),
                    children: <TextSpan>[
                      TextSpan(
                          text: 'is ',
                          style: TextStyle(
                              fontSize: 22, fontFamily: 'Times New Roman')),
                      TextSpan(
                          text: 'amazing!',
                          style: TextStyle(
                              fontSize: 24,
                              fontFamily: 'Courier',
                              fontWeight: FontWeight.bold)),
                    ],
                  ),
                ),
                SizedBox(height: 20),
                Text(
                  'Adding Links:',
                  style: TextStyle(fontSize: 20, fontWeight: FontWeight.bold),
                ),
                RichText(
                  text: TextSpan(
                    text: 'For more info, visit ',
                    style: TextStyle(fontSize: 18, color: Colors.black),
                    children: <TextSpan>[
                      TextSpan(
                        text: 'Flutter.dev',
                        style: TextStyle(
                            color: Colors.blue,
                            decoration: TextDecoration.underline),
                      ),
                      TextSpan(
                          text: ' for details.',
                          style: TextStyle(color: Colors.black)),
                    ],
                  ),
                ),
                SizedBox(height: 20),
                Text(
                  'Highlighting Text:',
                  style: TextStyle(fontSize: 20, fontWeight: FontWeight.bold),
                ),
                RichText(
                  text: TextSpan(
                    text: 'Notice the ',
                    style: TextStyle(fontSize: 18, color: Colors.black),
                    children: <TextSpan>[
                      TextSpan(
                        text: 'highlighted',
                        style: TextStyle(backgroundColor: Colors.yellow),
                      ),
                      TextSpan(
                          text: ' text.',
                          style: TextStyle(color: Colors.black)),
                    ],
                  ),
                ),
                SizedBox(height: 20),
                Text(
                  'Combining Widgets:',
                  style: TextStyle(fontSize: 20, fontWeight: FontWeight.bold),
                ),
                Row(
                  mainAxisAlignment: MainAxisAlignment.center,
                  children: [
                    RichText(
                      text: TextSpan(
                        text: 'This is ',
                        style: TextStyle(fontSize: 18, color: Colors.black),
                        children: <TextSpan>[
                          TextSpan(
                              text: 'Flutter',
                              style: TextStyle(
                                  fontWeight: FontWeight.bold,
                                  color: Colors.blue)),
                          TextSpan(
                              text: ' with an icon: ',
                              style: TextStyle(color: Colors.black)),
                        ],
                      ),
                    ),
                    Icon(Icons.flutter_dash, size: 50, color: Colors.blue),
                  ],
                ),
              ],
            ),
          ),
        ),
      ),
    );
  }
}
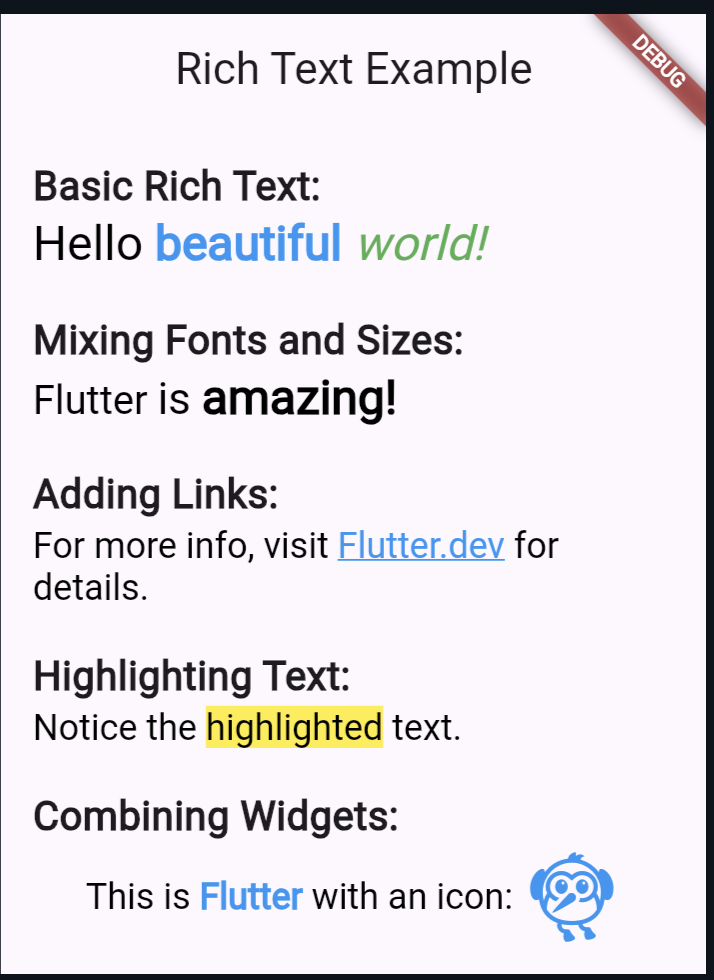
Output:

Also read:
Conclusion
Rich text is a powerful tool in Flutter that can significantly enhance the visual appeal and user experience of your application. By using the RichText widget, you can create beautifully styled text with various fonts, sizes, colors, and interactive elements. Whether you’re looking to emphasize certain words, add links, or simply make your app’s text more engaging, rich text provides the flexibility you need.
Experiment with different styles and combinations to find the perfect look for your app. With the right use of rich text, your Flutter application can stand out with a polished and professional appearance.
Follow for more: rich text flutter
