In this tutorial, we will insert AlertDialog in Flutter applications, providing users with informative pop-ups and prompts for better user experience and interaction.
This guide provides two full code examples with a basic alert box and a form alert box.
Let’s go…
Table of Contents

Example 1: Insert Alertdialog in Flutter – Full Code
To insert an AlertDialog in Flutter, you can use the showDialog function from the flutter/material.dart library. Here’s an example of how you can do it:
import 'package:flutter/material.dart';

void main() {
  runApp(MyApp());
}

class MyApp extends StatelessWidget {
  @override
  Widget build(BuildContext context) {
    return MaterialApp(
      home: HomePage(),
    );
  }
}

class HomePage extends StatelessWidget {
  @override
  Widget build(BuildContext context) {
    return Scaffold(
      appBar: AppBar(
        title: Text('AlertDialog Example'),
      ),
      body: Center(
        child: ElevatedButton(
          onPressed: () {
            showDialog(
              context: context,
              builder: (BuildContext context) {
                return AlertDialog(
                  title: Text('Alert Dialog'),
                  content: Text('This is an example of an AlertDialog'),
                  actions: [
                    TextButton(
                      onPressed: () {
                        Navigator.of(context).pop();
                      },
                      child: Text('Close'),
                    ),
                  ],
                );
              },
            );
          },
          child: Text('Show Alert Dialog'),
        ),
      ),
    );
  }
}
In the above example:
- We create a
MaterialAppwith aHomePagewidget. - Inside the
HomePagewidget, we have anElevatedButton. - When the
ElevatedButtonis pressed, theshowDialogfunction is called with thecontextand abuilderfunction. - The
builderfunction returns anAlertDialogwidget, which is a pre-built dialog box provided by Flutter. - The
AlertDialogwidget has atitle,content, andactionsproperty. - The
actionsproperty is a list of widgets that represent the actions (buttons) inside the dialog. - In this example, we have a single
TextButtonwith the text “Close” that dismisses the dialog when pressed.
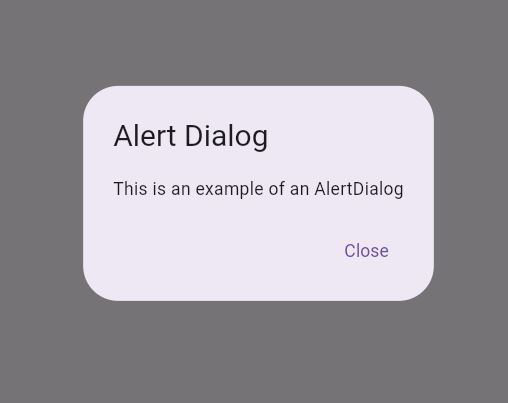
When you run this code, you’ll see an “Alert Dialog” button on the screen. Tapping the button will display an AlertDialog with the text “This is an example of an AlertDialog” and a “Close” button.
Output

Check Out:
- How to Create Custom Cards in Flutter?
- How to Convert Int to Double in Flutter?
- How to Center Title in Appbar in Flutter?
- How to Show Custom Toast Messages in Flutter?
Example 2: Insert Alertdialog in Flutter – Full Code
import 'package:flutter/material.dart';

void main() {
  runApp(MyApp());
}

class MyApp extends StatelessWidget {
  @override
  Widget build(BuildContext context) {
    return MaterialApp(
      home: MyHomePage(),
    );
  }
}

class MyHomePage extends StatefulWidget {
  @override
  _MyHomePageState createState() => _MyHomePageState();
}

class _MyHomePageState extends State<MyHomePage> {
  String _name = '';

  @override
  Widget build(BuildContext context) {
    return Scaffold(
      appBar: AppBar(
        title: Text('AlertDialog Example'),
      ),
      body: Center(
        child: ElevatedButton(
          onPressed: () {
            showDialog(
              context: context,
              builder: (BuildContext context) {
                return AlertDialog(
                  title: Text('Enter Your Name'),
                  content: TextField(
                    onChanged: (value) {
                      setState(() {
                        _name = value;
                      });
                    },
                    decoration: InputDecoration(
                      hintText: 'Enter your name',
                    ),
                  ),
                  actions: [
                    TextButton(
                      onPressed: () {
                        Navigator.of(context).pop();
                      },
                      child: Text('Cancel'),
                    ),
                    ElevatedButton(
                      onPressed: () {
                        Navigator.of(context).pop();
                        showDialog(
                          context: context,
                          builder: (BuildContext context) {
                            return AlertDialog(
                              title: Text('Welcome'),
                              content: Text('Hello, $_name!'),
                              actions: [
                                TextButton(
                                  onPressed: () {
                                    Navigator.of(context).pop();
                                  },
                                  child: Text('OK'),
                                ),
                              ],
                            );
                          },
                        );
                      },
                      child: Text('Submit'),
                    ),
                  ],
                );
              },
            );
          },
          child: Text('Show AlertDialog'),
        ),
      ),
    );
  }
}
In this example:
- We have a
StatefulWidgetcalledMyHomePagethat maintains the state of the user’s name. - When the “Show AlertDialog” button is pressed, it displays an AlertDialog with a
TextFieldfor the user to enter their name. - The
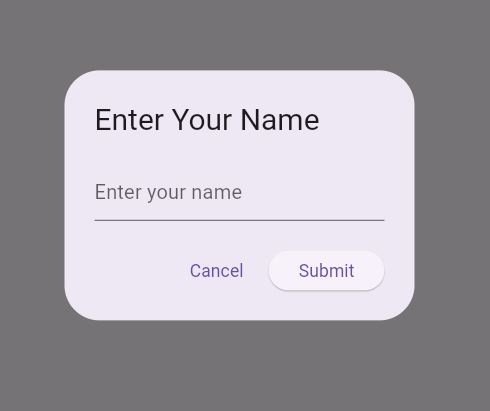
TextFieldupdates the_namestate variable whenever the text changes. - The AlertDialog has two buttons: “Cancel” and “Submit”.
- If the user clicks “Cancel”, the dialog is dismissed.
- If the user clicks “Submit”, another AlertDialog is displayed with the message “Hello, [user’s name]!” and an “OK” button.
- The second dialog is dismissed when the “OK” button is pressed.
This example demonstrates how you can use an AlertDialog to collect user input (in this case, a name) and then display another AlertDialog based on that input.
Output

Conclusion
You can customize the AlertDialog further by adding more actions, changing the title, and content, or even adding additional widgets (like TextFields) inside the content section.
If you haven’t already installed Flutter, you can follow the official: Flutter Installation Guide. to set it up.
