In this blog post, we will explore how to create Flutter horizontal scroll in list with multiple examples.
You can create custom widgets to display in the horizontal list for more complex scenarios. Let’s create a card with an image and some text.
Table of Contents

Getting Started – Flutter horizontal scroll in list
Before we begin, make sure you have Flutter installed and set up on your machine. You can find the installation instructions on the official Flutter website.
Example 1: Basic Flutter horizontal scroll in list
Let’s start with a simple example of a horizontal list using the ListView widget.
1. Define the Main Screen
Create a new Flutter project and define a basic horizontal list in the HomeScreen.
import 'package:flutter/material.dart';

void main() {
  runApp(MyApp());
}

class MyApp extends StatelessWidget {
  @override
  Widget build(BuildContext context) {
    return MaterialApp(
      title: 'Horizontal List Example',
      theme: ThemeData(
        primarySwatch: Colors.blue,
      ),
      home: HomeScreen(),
    );
  }
}

class HomeScreen extends StatelessWidget {
  @override
  Widget build(BuildContext context) {
    return Scaffold(
      appBar: AppBar(
        title: Text('Horizontal List Example'),
      ),
      body: Padding(
        padding: const EdgeInsets.all(8.0),
        child: Container(
          height: 200,
          child: ListView.builder(
            scrollDirection: Axis.horizontal,
            itemCount: 10,
            itemBuilder: (context, index) {
              return Container(
                width: 160,
                margin: EdgeInsets.symmetric(horizontal: 8.0),
                color: Colors.blueAccent,
                child: Center(
                  child: Text(
                    'Item $index',
                    style: TextStyle(color: Colors.white, fontSize: 20),
                  ),
                ),
              );
            },
          ),
        ),
      ),
    );
  }
}
Advance Example: Horizontal Scrolling List with SingleChildScrollView and Row
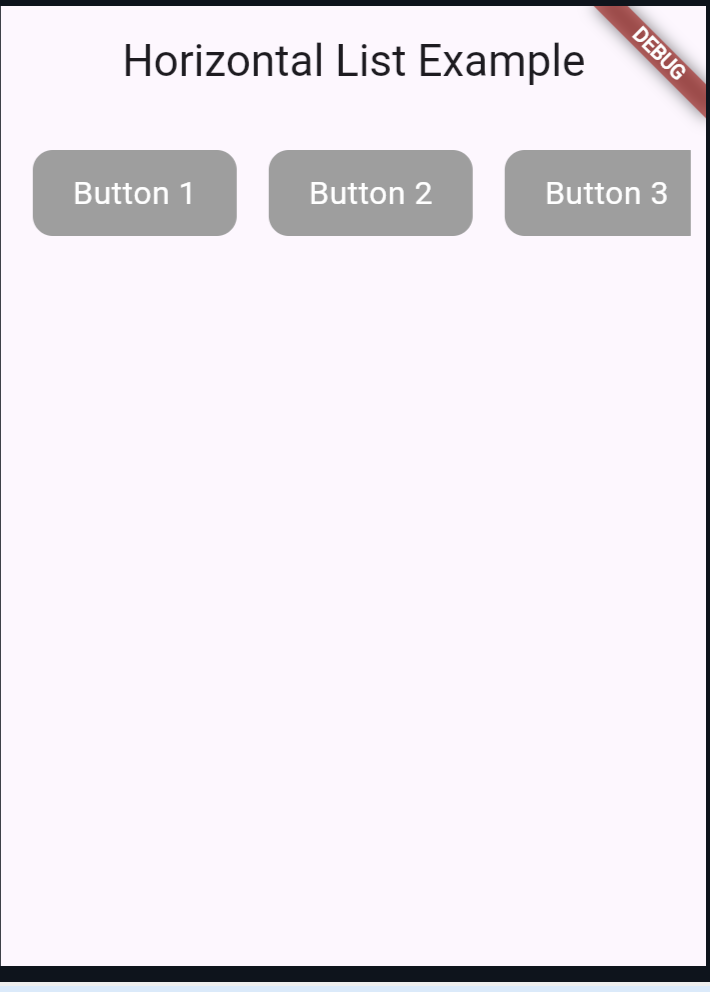
This example will display a horizontal list of buttons using SingleChildScrollView and Row.
import 'package:flutter/material.dart';

void main() {
  runApp(MyApp());
}

class MyApp extends StatelessWidget {
  @override
  Widget build(BuildContext context) {
    return MaterialApp(
      title: 'Horizontal List Example',
      theme: ThemeData(
        primarySwatch: Colors.blue,
      ),
      home: HomeScreen(),
    );
  }
}

enum ButtonType {
  Button1,
  Button2,
  Button3,
  Button4;

  String get displayName {
    switch (this) {
      case ButtonType.Button1:
        return "Button 1";
      case ButtonType.Button2:
        return "Button 2";
      case ButtonType.Button3:
        return "Button 3";
      case ButtonType.Button4:
        return "Button 4";
      default:
        return "";
    }
  }
}

class HomeScreen extends StatefulWidget {
  @override
  _HomeScreenState createState() => _HomeScreenState();
}

class _HomeScreenState extends State<HomeScreen> {
  int selectedIndex = -1;

  @override
  Widget build(BuildContext context) {
    return Scaffold(
      appBar: AppBar(
        title: Text('Horizontal List Example'),
      ),
      body: Padding(
        padding: const EdgeInsets.all(8.0),
        child: SingleChildScrollView(
          scrollDirection: Axis.horizontal,
          child: Row(
            children: List.generate(
              ButtonType.values.length,
              (index) => Padding(
                padding: const EdgeInsets.all(8.0),
                child: CButton(
                  btnText: ButtonType.values[index].displayName,
                  onTap: () {
                    setState(() {
                      if (selectedIndex == index) {
                        selectedIndex = -1; // Deselect the current item if tapped again
                      } else {
                        selectedIndex = index; // Select the tapped item
                      }
                    });
                  },
                  isSelected: selectedIndex == index,
                ),
              ),
            ),
          ),
        ),
      ),
    );
  }
}

class CButton extends StatelessWidget {
  final String btnText;
  final VoidCallback onTap;
  final bool isSelected;

  CButton({required this.btnText, required this.onTap, required this.isSelected});

  @override
  Widget build(BuildContext context) {
    return GestureDetector(
      onTap: onTap,
      child: Container(
        padding: EdgeInsets.symmetric(vertical: 10, horizontal: 20),
        decoration: BoxDecoration(
          color: isSelected ? Colors.blue : Colors.grey,
          borderRadius: BorderRadius.circular(10),
        ),
        child: Text(
          btnText,
          style: TextStyle(
            color: Colors.white,
            fontSize: 16,
          ),
        ),
      ),
    );
  }
}
Explanation
- ButtonType Enum: An enum
ButtonTypeis defined to represent different types of buttons, each with a display name. - HomeScreen: This is the main screen containing the horizontal scrolling list. It uses
SingleChildScrollViewandRowto create a horizontal list ofVButtonwidgets. - CButton: A custom widget that represents each button in the list. It changes color based on whether it is selected or not.
- State Management: The
_HomeScreenStateclass manages the state of the selected button. When a button is tapped, the state is updated to reflect the selection.
Running the Code
Ensure you have Flutter installed and properly set up. You can run the app using the following command:
flutter runOutput:

Also read:
Conclusion
Horizontal scrolling lists are a common and versatile UI pattern in mobile applications. With Flutter, you can easily implement these lists using widgets like ListView and PageView.
By following the examples in this guide, you can create beautiful horizontal scrolling lists that enhance the user experience in your Flutter applications. Feel free to experiment and customize these examples to suit your specific needs
