In this tutorial, we’ll explore how to create a simple dialogue box in Flutter using the showDialog function.
Table of Contents
Setting Up a Flutter Project
Before we dive into creating a dialogue box, make sure you have Flutter installed on your machine. You can follow the instructions on the official Flutter website to get started: Flutter Installation Guide.

Once Flutter is set up, create a new Flutter project using the following commands in your terminal:
flutter create dialogue_box_flutter
cd dialogue_box_flutter
Open the project in your preferred code editor.
Creating a Dialogue Box in Flutter
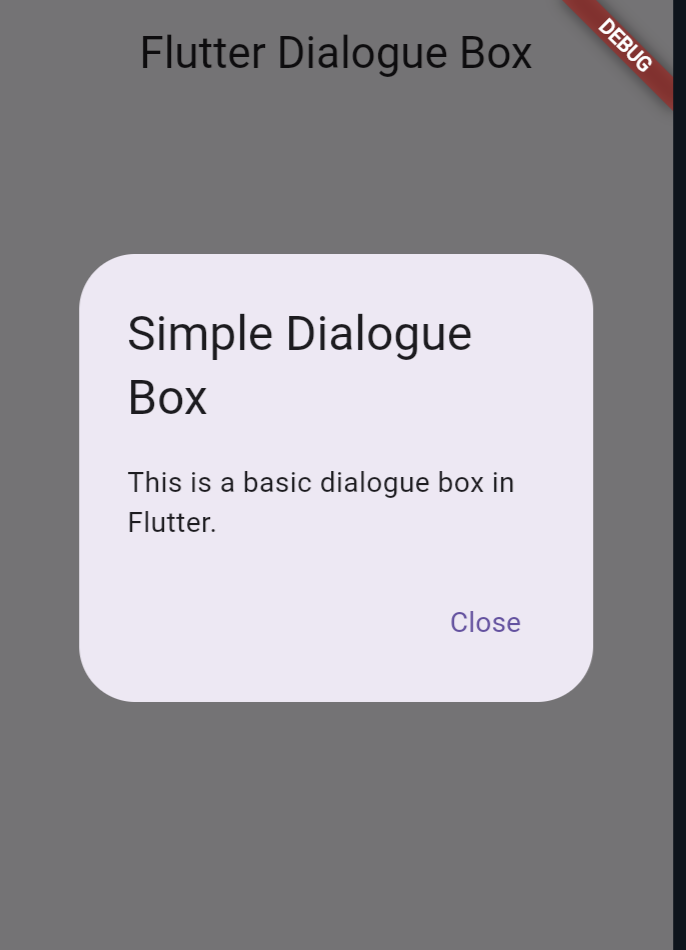
In Flutter, a dialogue box is typically created using the showDialog function. Let’s create a simple dialogue box that displays a message and a close button.
1. Open the lib/main.dart file and replace its content with the following code:
// Function to show the dialogue box
  void _showDialog(BuildContext context) {
    showDialog(
      context: context,
      barrierDismissible: false,
      builder: (BuildContext context) {
        return AlertDialog(
          title: Text('Simple Dialogue Box'),
          content: Text('This is a basic dialogue box in Flutter.'),
          actions: [
            TextButton(
              onPressed: () {
                // Close the dialogue box
                Navigator.of(context).pop();
              },
              child: Text('Close'),
            ),
          ],
        );
      },
    );
  }
}
2. Run your Flutter App
Add one class first:
class MyApp extends StatelessWidget {
  @override
  Widget build(BuildContext context) {
    return MaterialApp(
      home: MyHomePage(),
    );
  }
}
Add main class:
void main() {
  runApp(MyApp());
}
Full code:
import 'package:flutter/material.dart';

void main() {
  runApp(MyApp());
}

class MyApp extends StatelessWidget {
  @override
  Widget build(BuildContext context) {
    return MaterialApp(
      home: MyHomePage(),
    );
  }
}

class MyHomePage extends StatelessWidget {
  @override
  Widget build(BuildContext context) {
    return Scaffold(
      appBar: AppBar(
        title: Text('Flutter Dialogue Box'),
      ),
      body: Center(
        child: ElevatedButton(
          onPressed: () {
            // Call the function to show the dialogue box
            _showDialog(context);
          },
          child: Text('Show Dialogue Box'),
        ),
      ),
    );
  }

  // Function to show the dialogue box
  void _showDialog(BuildContext context) {
    showDialog(
      context: context,
      barrierDismissible: false,
      builder: (BuildContext context) {
        return AlertDialog(
          title: Text('Simple Dialogue Box'),
          content: Text('This is a basic dialogue box in Flutter.'),
          actions: [
            TextButton(
              onPressed: () {
                // Close the dialogue box
                Navigator.of(context).pop();
              },
              child: Text('Close'),
            ),
          ],
        );
      },
    );
  }
}
In the example, barrierDismissible is set to false, meaning that the user cannot dismiss the dialog by tapping outside of it.
This is useful in scenarios where you want to enforce user interaction with the dialog before allowing them to proceed or close it. If you set it to true, tapping outside the dialog will close it, providing a more permissive interaction model.
The ability of the user to dismiss the dialog by touching on the area outside the dialog box is determined by the barrierDismissible attribute in Flutter’s showDialog method.
  // Function to show the dialogue box
  void _showDialog(BuildContext context) {
    showDialog(
      context: context,
      builder: (BuildContext context) {
        return AlertDialog(
          title: Text('Simple Dialogue Box'),
          content: Text('This is a basic dialogue box in Flutter.'),
          actions: [
            TextButton(
              onPressed: () {
                // Close the dialogue box
                Navigator.of(context).pop();
              },
              child: Text('Close'),
            ),
          ],
        );
      },
    );
  }
}
Tapping on the overlay (outside the dialog) will close the dialog when barrierDismissible is set to true. Tapping outside of the dialog will not function if it is set to false.
Run from terminal
flutter run

Also Read
- Securing Your Flutter Project: How to Protect Your Code with Flutter Obfuscation?
- Getting an Android device ID in Flutter
Conclusion
This code sets up a basic Flutter app with a button. When the button is pressed, it triggers the _showDialog function, which displays a simple dialogue box with a title, content, and a close button.
Feel free to customize the content, appearance, and functionality of the dialogue box to suit your application’s needs.
Congratulations! You’ve successfully created a dialogue box in Flutter. This is just the beginning, and you can extend and enhance it based on your project requirements.
Explore the Flutter documentation for more advanced features and customization options.
