In this blog, we’ll dive into the concepts of Dart Classes and Objects, followed by practical examples in Flutter.
In Flutter, Dart is the programming language that powers the framework. Dart’s object-oriented nature allows you to create classes and objects, which are fundamental for structuring your code efficiently.
Table of Contents

What Are Dart Classes and Objects?
Class: A class is a blueprint for creating objects (instances). It defines a data structure by bundling data (fields) and methods (functions) that work on the data.
Object: An object is an instance of a class. When a class is defined, no memory is allocated until an object of that class is created.
Defining a Class in Dart
A basic Dart class can be defined with properties and methods. Let’s take a look at a simple Car class:
class Car {
  // Properties
  String brand;
  String model;
  int year;

  // Constructor
  Car(this.brand, this.model, this.year);

  // Method
  void displayInfo() {
    print('Brand: $brand, Model: $model, Year: $year');
  }
}
Creating an Object
Once you have a class, you can create objects. Here’s how you can create an object of the Car class:
void main() {
  // Creating an object of Car
  Car myCar = Car('Toyota', 'Corolla', 2022);

  // Accessing the method
  myCar.displayInfo();
}
Example in Flutter: Displaying Car Information
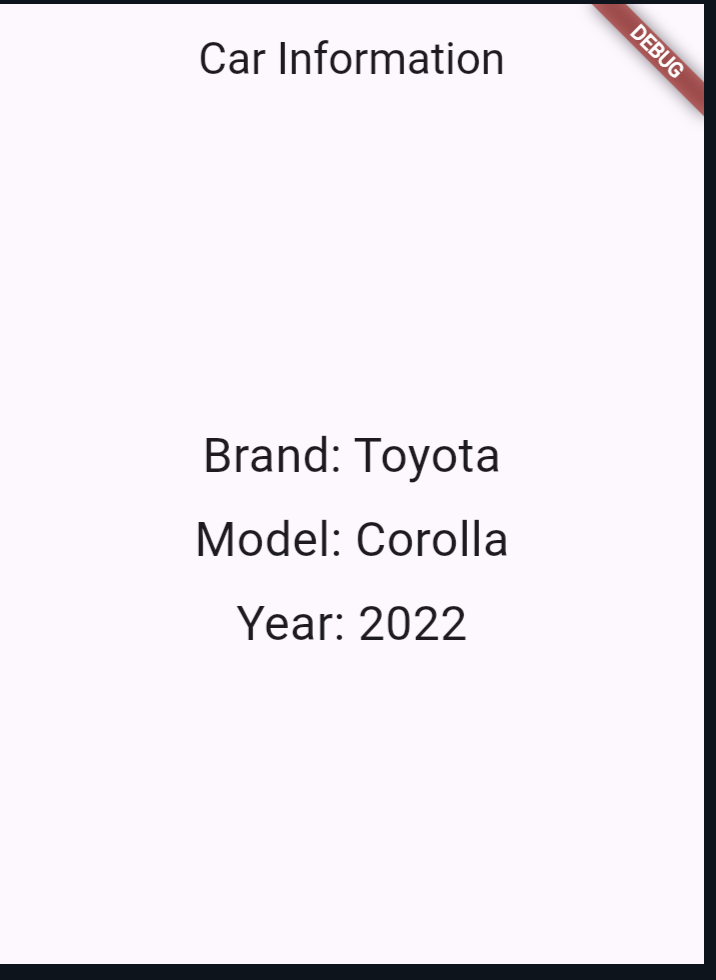
Let’s create a simple Flutter app that uses the Car class to display information about a car in the UI.
import 'package:flutter/material.dart';

void main() {
  runApp(MyApp());
}

class MyApp extends StatelessWidget {
  @override
  Widget build(BuildContext context) {
    return MaterialApp(
      title: 'Car Info App',
      theme: ThemeData(
        primarySwatch: Colors.blue,
      ),
      home: CarInfoScreen(),
    );
  }
}

// Car class definition
class Car {
  String brand;
  String model;
  int year;

  Car(this.brand, this.model, this.year);
}

// Flutter screen to display car info
class CarInfoScreen extends StatelessWidget {
  // Creating a Car object
  final Car myCar = Car('Toyota', 'Corolla', 2022);

  @override
  Widget build(BuildContext context) {
    return Scaffold(
      appBar: AppBar(
        title: Text('Car Information'),
      ),
      body: Center(
        child: Padding(
          padding: const EdgeInsets.all(16.0),
          child: Column(
            mainAxisSize: MainAxisSize.min,
            children: [
              Text(
                'Brand: ${myCar.brand}',
                style: TextStyle(fontSize: 24),
              ),
              SizedBox(height: 8),
              Text(
                'Model: ${myCar.model}',
                style: TextStyle(fontSize: 24),
              ),
              SizedBox(height: 8),
              Text(
                'Year: ${myCar.year}',
                style: TextStyle(fontSize: 24),
              ),
            ],
          ),
        ),
      ),
    );
  }
}
Explanation of the Flutter Example
- Car Class: The
Carclass is defined with three properties:brand,model, andyear. The constructor initializes these properties. - CarInfoScreen Widget: This is a Flutter widget that displays the information of the
Carobject. The car’s brand, model, and year are displayed usingTextwidgets. - MaterialApp and Scaffold: These widgets set up the basic structure of the Flutter app, with a title and an
AppBar.
Constructors in Dart Classes and Objects
In the Car class, we used a constructor to initialize the properties. Dart supports different types of constructors:
1. Default Constructor
If you don’t define a constructor, Dart provides a default one.
class Car {
  String brand;
  String model;
  int year;

  // Default constructor
  Car() {
    brand = 'Unknown';
    model = 'Unknown';
    year = 0;
  }
}
2. Named Constructor
You can define multiple constructors using named constructors.
class Car {
  String brand;
  String model;
  int year;

  Car(this.brand, this.model, this.year);

  // Named constructor
  Car.withoutModel(this.brand, this.year) {
    model = 'Unknown';
  }
}
Encapsulation with Getters and Setters
Encapsulation is a key principle of object-oriented programming. In Dart, you can use getters and setters to encapsulate properties.
class Car {
  String _brand; // Private property
  String _model; // Private property
  int _year;

  Car(this._brand, this._model, this._year);

  // Getter
  String get brand => _brand;

  // Setter
  set brand(String value) {
    _brand = value;
  }

  void displayInfo() {
    print('Brand: $_brand, Model: $_model, Year: $_year');
  }
}
Output:

Also read:
Conclusion
Understanding classes and objects is fundamental for building robust Flutter apps. Dart’s object-oriented nature allows you to model real-world entities efficiently, making your code more organized and maintainable.
In this blog, We covered the basics of Dart classes, objects, constructors, and encapsulation, with a practical Flutter example to demonstrate these concepts.
Now that you have a solid understanding of classes and objects in Dart, you can start applying these principles to build more complex and scalable Flutter applications.
