In this tutorial, we’ll learn how to create and use class and object in Flutter. This is fundamental for developing robust Flutter applications, as it helps organize code and manage data effectively. We’ll go through a clear example to illustrate the concepts.
Table of Contents

Step-by-Step Guide for class and object in Flutter
Step 1: Setting Up class and object in Flutter
Before we start, make sure you have Flutter installed on your system. Follow the official Flutter installation guide if you haven’t already.
Create a new Flutter project by running the following command in your terminal:
flutter create class_example
cd class_example
Open the project in your preferred code editor.
Step 2: Creating a Basic Class
Let’s define a simple class called Person that has a name and age. Add the following code to lib/main.dart:
class Person {
  String name;
  int age;

  Person(this.name, this.age);

  void displayInfo() {
    print('Name: $name, Age: $age');
  }
}
In this code:
- We define a class
Personwith two properties:nameandage. - The constructor
Person(this.name, this.age)initializes these properties. - The
displayInfomethod prints the person’s name and age.
Step 3: Creating and Using an Object
Next, we’ll create an object of the Person class and use it in our Flutter app. Update lib/main.dart with the following code:
import 'package:flutter/material.dart';

class Person {
  String name;
  int age;

  Person(this.name, this.age);

  void displayInfo() {
    print('Name: $name, Age: $age');
  }
}


void main() {
  runApp(MyApp());
}

class MyApp extends StatelessWidget {
  @override
  Widget build(BuildContext context) {
    return MaterialApp(
      title: 'Class and Object Example',
      home: PersonScreen(),
    );
  }
}

class PersonScreen extends StatelessWidget {
  @override
  Widget build(BuildContext context) {
    Person person = Person('John Doe', 25);

    return Scaffold(
      appBar: AppBar(
        title: Text('Class and Object Example'),
      ),
      body: Center(
        child: Column(
          mainAxisAlignment: MainAxisAlignment.center,
          children: [
            Text(
              'Name: ${person.name}',
              style: TextStyle(fontSize: 20),
            ),
            Text(
              'Age: ${person.age}',
              style: TextStyle(fontSize: 20),
            ),
            SizedBox(height: 20),
            ElevatedButton(
              onPressed: () {
                person.displayInfo();
              },
              child: Text('Display Info in Console'),
            ),
          ],
        ),
      ),
    );
  }
}
Step 4: Running the App
You can now run your app using the following command:
flutter run
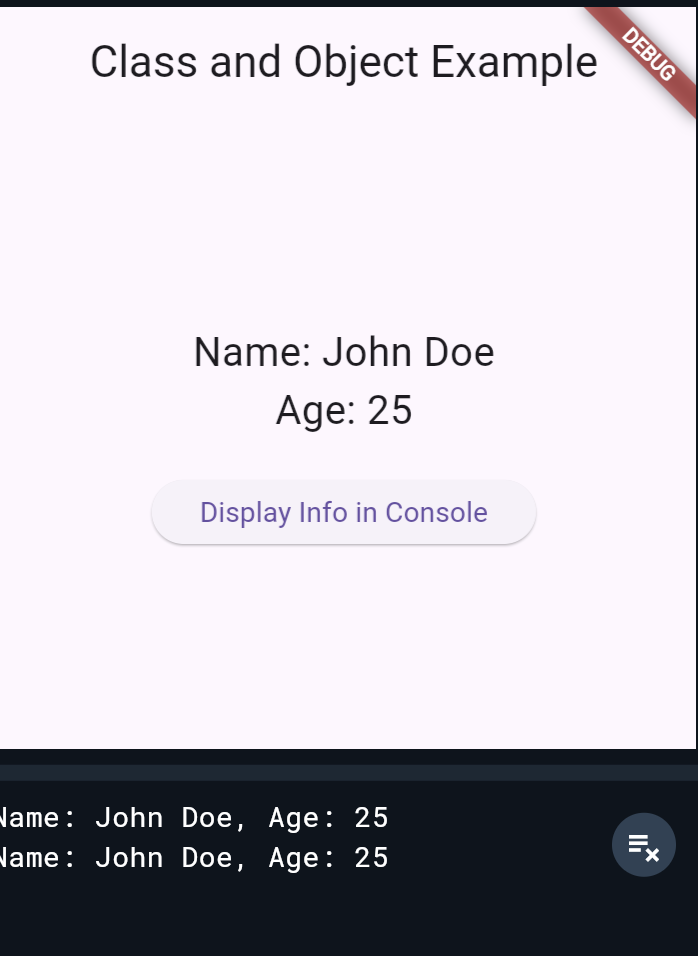
This will launch the app in the emulator or on a connected device. You’ll see the name and age displayed on the screen. Pressing the “Display Info in Console” button will print the person’s information to the console.
Output:

Conclusion
In this tutorial, we learned how to create and use a basic class and object in Flutter. We defined a Person class, created an object, and used it to display information in the UI and console. This foundational concept is essential for building more complex and organized Flutter applications. Happy coding!
Further Reading
For more information on Flutter and Dart programming, check out these resources:
These resources will help you dive deeper into Flutter development and improve your coding skills.
Also read:
- Create a Flutter app to find the LCM (Least common multiple) of two numbers
- Build a Vowel Counter App in Flutter
