In this blog, we’ll walk through Add Google Maps in Flutter using the google_maps_flutter package, complete with code examples.
Integrating Google Maps into your Flutter application can enhance the user experience by providing interactive maps with features like markers, custom overlays, and more.
Table of Contents

Prerequisites for Add Google Maps in Flutter
Flutter Setup: Ensure Flutter is installed on your machine. You can download it from the official Flutter website.
Google Maps API Key: Obtain an API key from the Google Cloud Console. Enable the Maps SDK for Android and iOS.
Add Dependencies – Add Google Maps in Flutter
In your pubspec.yaml file, add the google_maps_flutter dependency:
dependencies:
  flutter:
    sdk: flutter
  google_maps_flutter: ^2.1.1
Run flutter pub get to install the package.
Configure Android and iOS
For Android:
- Open
android/app/src/main/AndroidManifest.xmland add the following permissions and meta-data:
<manifest xmlns:android="http://schemas.android.com/apk/res/android">
    <application>
        <!-- Add the following inside the <application> tag -->
        <meta-data
            android:name="com.google.android.geo.API_KEY"
            android:value="YOUR_API_KEY_HERE"/>
    </application>
</manifest>
Ensure you have the correct API key .
For iOS:
- Open
ios/Runner/Info.plistand add the following entry:
<key>NSLocationWhenInUseUsageDescription</key>
<string>We need your location for maps.</string>
<key>NSLocationAlwaysUsageDescription</key>
<string>We need your location for maps.</string>
<key>CFBundleURLTypes</key>
<array>
    <dict>
        <key>CFBundleURLSchemes</key>
        <array>
            <string>com.googleusercontent.apps.YOUR_CLIENT_ID</string>
        </array>
    </dict>
</array>
Replace YOUR_CLIENT_ID with your actual client ID.
Implementing Google Map
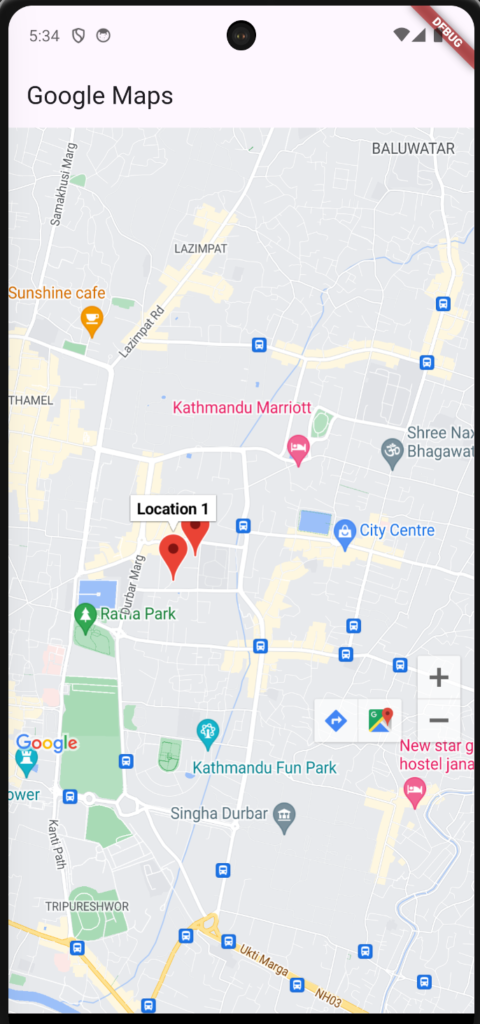
Here’s a complete example of how to integrate a Google Map with markers in Flutter:
import 'package:flutter/material.dart';
import 'package:google_maps_flutter/google_maps_flutter.dart';

class MapScreen extends StatefulWidget {
  final List<LocationItem> itemsWithLocation;
  const MapScreen({Key? key, required this.itemsWithLocation}) : super(key: key);

  @override
  _MapScreenState createState() => _MapScreenState();
}

class _MapScreenState extends State<MapScreen> {
  late GoogleMapController mapController;
  final Set<Marker> markers = {};

  @override
  void initState() {
    super.initState();
    _setMarkers();
  }

  void _setMarkers() {
    for (var item in widget.itemsWithLocation) {
      markers.add(Marker(
        markerId: MarkerId(item.id),
        position: LatLng(item.location!.coordinates![1], item.location!.coordinates![0]),
        infoWindow: InfoWindow(title: item.title),
      ));
    }
  }

  @override
  Widget build(BuildContext context) {
    return Scaffold(
      appBar: AppBar(
        title: Text('Google Maps'),
      ),
      body: GoogleMap(
        padding: EdgeInsets.only(bottom: MediaQuery.of(context).size.height * 0.25),
        mapType: MapType.normal,
        myLocationEnabled: true,
        tiltGesturesEnabled: true,
        compassEnabled: true,
        scrollGesturesEnabled: true,
        zoomGesturesEnabled: true,
        zoomControlsEnabled: true,
        markers: markers,
        onCameraMove: (CameraPosition cameraPosition) {
          print(cameraPosition.zoom);
        },
        onMapCreated: (controller) {
          mapController = controller;
          if (widget.itemsWithLocation.isNotEmpty) {
            mapController.animateCamera(CameraUpdate.newLatLngZoom(
              LatLng(widget.itemsWithLocation[0].location!.coordinates![1],
                  widget.itemsWithLocation[0].location!.coordinates![0]),
              12.0,
            ));
          }
        },
        initialCameraPosition: CameraPosition(
          target: LatLng(
            widget.itemsWithLocation.isNotEmpty
                ? widget.itemsWithLocation[0].location!.coordinates![1]
                : 27.708309903,
            widget.itemsWithLocation.isNotEmpty
                ? widget.itemsWithLocation[0].location!.coordinates![0]
                : 85.318825202,
          ),
          zoom: 12.0,
        ),
      ),
    );
  }
}

class LocationItem {
  final String id;
  final String title;
  final LocationCoordinates? location;

  LocationItem({required this.id, required this.title, this.location});
}

class LocationCoordinates {
  final List<double>? coordinates;

  LocationCoordinates({this.coordinates});
}

void main() => runApp(MaterialApp(
  home: MapScreen(
    itemsWithLocation: [
      LocationItem(
        id: '1',
        title: 'Location 1',
        location: LocationCoordinates(coordinates: [85.318825202, 27.708309903]),
      ),
      LocationItem(
        id: '2',
        title: 'Location 2',
        location: LocationCoordinates(coordinates: [85.318825202, 27.709309903]),
      ),
    ],
  ),
));
- GoogleMap Widget: We configure the map with various properties like
mapType,myLocationEnabled, and gesture settings. - Markers: Markers are dynamically added based on the
itemsWithLocationlist. - Camera Position: The initial camera position is set to the first location or defaults to specific coordinates.
Full code:
import 'package:flutter/foundation.dart';
import 'package:flutter/material.dart';
import 'package:google_maps_flutter/google_maps_flutter.dart';

void main() => runApp(const MyApp());

class MyApp extends StatelessWidget {
  const MyApp({super.key});

  @override
  Widget build(BuildContext context) {
    return MaterialApp(
      title: 'Flutter Google Maps Demo',
      theme: ThemeData(
        primarySwatch: Colors.blue,
      ),
      home: MapScreen(
        itemsWithLocation: [
          LocationItem(
            id: '1',
            title: 'Location 1',
            location:
                LocationCoordinates(coordinates: [85.318825202, 27.708309903]),
          ),
          LocationItem(
            id: '2',
            title: 'Location 2',
            location:
                LocationCoordinates(coordinates: [85.319825202, 27.709309903]),
          ),
        ],
      ),
    );
  }
}

class MapScreen extends StatefulWidget {
  final List<LocationItem> itemsWithLocation;
  const MapScreen({super.key, required this.itemsWithLocation});

  @override
  State<StatefulWidget> createState() => _MapScreenState();
}

class _MapScreenState extends State<MapScreen> {
  late GoogleMapController mapController;
  final Set<Marker> markers = {};

  @override
  void initState() {
    super.initState();
    _setMarkers();
  }

  void _setMarkers() {
    for (var item in widget.itemsWithLocation) {
      markers.add(Marker(
        markerId: MarkerId(item.id),
        position: LatLng(
            item.location!.coordinates![1], item.location!.coordinates![0]),
        infoWindow: InfoWindow(title: item.title),
      ));
    }
  }

  @override
  Widget build(BuildContext context) {
    return Scaffold(
      appBar: AppBar(
        title: const Text('Google Maps'),
      ),
      body: GoogleMap(
        padding:
            EdgeInsets.only(bottom: MediaQuery.of(context).size.height * 0.25),
        mapType: MapType.normal,
        myLocationEnabled: true,
        tiltGesturesEnabled: true,
        compassEnabled: true,
        scrollGesturesEnabled: true,
        zoomGesturesEnabled: true,
        zoomControlsEnabled: true,
        markers: markers,
        onCameraMove: (CameraPosition cameraPosition) {
          if (kDebugMode) {
            print(cameraPosition.zoom);
          }
        },
        onMapCreated: (controller) {
          mapController = controller;
          if (widget.itemsWithLocation.isNotEmpty) {
            mapController.animateCamera(CameraUpdate.newLatLngZoom(
              LatLng(widget.itemsWithLocation[0].location!.coordinates![1],
                  widget.itemsWithLocation[0].location!.coordinates![0]),
              12.0,
            ));
          }
        },
        initialCameraPosition: CameraPosition(
          target: LatLng(
            widget.itemsWithLocation.isNotEmpty
                ? widget.itemsWithLocation[0].location!.coordinates![1]
                : 27.708309903,
            widget.itemsWithLocation.isNotEmpty
                ? widget.itemsWithLocation[0].location!.coordinates![0]
                : 85.318825202,
          ),
          zoom: 12.0,
        ),
      ),
    );
  }
}

class LocationItem {
  final String id;
  final String title;
  final LocationCoordinates? location;

  LocationItem({required this.id, required this.title, this.location});
}

class LocationCoordinates {
  final List<double>? coordinates;

  LocationCoordinates({this.coordinates});
}
Output:

Also read:
- Creating a Basic Class and Object in Flutter
- Create a Flutter app to find the LCM (Least common multiple) of two numbers
Conclusion
This example shows how to integrate a Google Map into your Flutter application, including adding markers and configuring map controls. Customize it further based on your requirements, such as adding custom markers, handling map clicks, or displaying user location.
Visit GitHub for full code and demo output.
